Laying Your Financial Foundation: A Guide To Mint Transactions

Understand where your money is going. Align your spending with your values. Make your financial goals a reality. Obtain the freedom to live the life you’ve always wanted.
A highly-optimized and easy-to-implement financial plan can deliver on all of the above. And if you’ve been following the Master Your Money series from the beginning, you’re on track to create just that.
In this article we’ll walk through how to use Mint transactions to lay the foundation upon which you will build the money management system that can power you to financial freedom. So grab your trowel, and let’s get started!
A Recap Of Mint Functionality
We took a high-level look at Mint’s features not long ago in Personal Finance Made Easy: Master Your Money With Mint. If you haven’t yet read that article, I recommend you do so now as it will provide you with the necessary context for the rest of this post.
Mint not only prevents you from ever forgetting to pay a bill on time, it also creates budgets for you and tracks your spending automatically so you can see where your money is going. One of it’s best features is that it performs all of this without the need for any investment of time or effort on your part. What makes all of this possible? The seemingly-insignificant Mint transaction.
While this guide will make the most sense if you read it top-to-bottom, you do not need to know all of what I will be covering today to simply get started with Mint transactions. The below guide is an all-in-one introduction and comprehensive review of everything you will need to know about using Mint transactions as you become more familiar with Mint’s interface and more advanced in your usage of it.
If you want to read merely the basics you need to get started, click here to jump ahead to the Master Your Money series action items at the end of the article. There you will find links which will direct you to the specific topics which you need to read. For those of you who want the full picture, read on!
Table of Contents
Mint Transactions – The Bricks In Your Financial Foundation
Think of your individual transactions in Mint as bricks that must be laid in a level and uniform fashion to construct a long-lasting and high quality foundation for your money management system.
While Mint automatically imports and categorizes your transactions as they occur, it can’t identify what you purchased with checks or cash and occasionally assigns a transaction to an incorrect category.
You’ll be making important decisions later on based on how Mint understands and classifies your spending. It is absolutely essential that you make sure Mint transactions are categorized as accurately as possible so you can fully trust Mint’s reporting.
With this in mind, today I’ll show you how to quickly structure, monitor, and query Mint transactions to ensure that the bricks in your financial foundation stay both straight and level as they are laid.
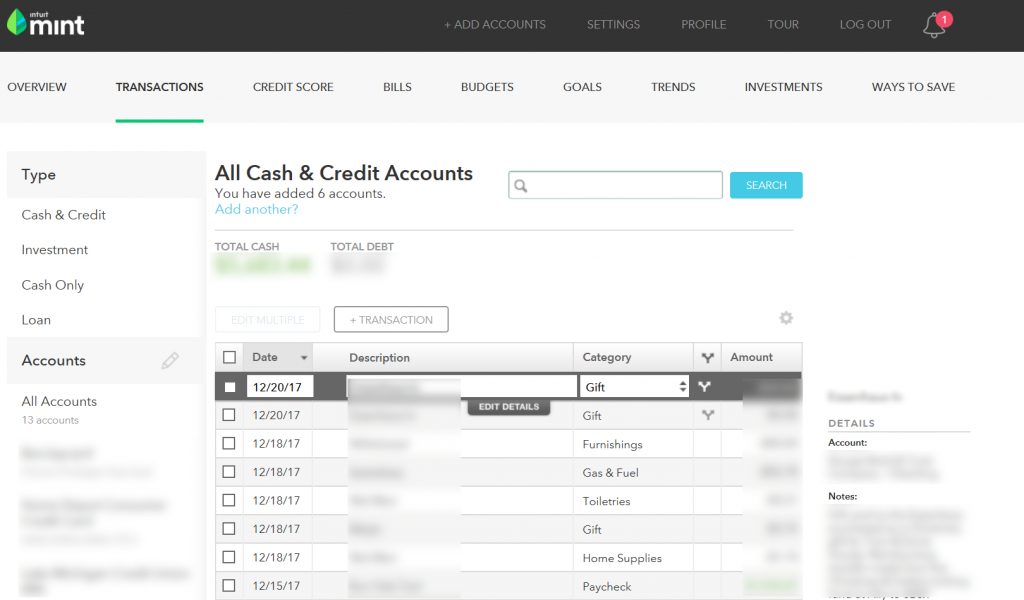
First things first, let me show you around a bit. The main Mint transactions page looks like what you see below, although I’ve blurred some content for sake of privacy:

Every time Mint syncs with your bank accounts, it displays any new transactions it finds in the main grid section of this page. Transactions are listed in descending order by transaction date. Transactions which are still pending in your bank accounts will be identified with italics.
A date, vendor description, and amount are displayed for each transaction, along with an income or spending category which is automatically assigned by Mint.
Clicking anywhere within a given row will highlight a transaction and display additional details regarding it in the right sidebar. This info includes the vendor, specific account affected, and any notes you’ve added to the transaction manually.
A small info graph displaying spending within the assigned category for the last three months is also displayed in the right sidebar. It illustrates average spending by month as well as a comparison to the U.S. average in the affected category.
Mint Transaction Categories
Transaction categories are where the magic happens in Mint. These puppies are what power all of Mint’s budgeting and trend reporting functionality. For example, if you have a budget set in Mint for the “Gas & Fuel” category, any transactions classified as “Gas & Fuel” will be counted as spending within that budget.
Mint starts with a list of existing transaction categories and sub-categories for common areas of household spending. To explore the existing list, simply click on the up and down arrows in the “Category” field for a given transaction.
Personalizing Your Transaction Sub-Categories
Over time, you will likely find that you want to personalize the list of available sub-categories in Mint so you can better monitor spending or set budgets for more specific income or spending types.
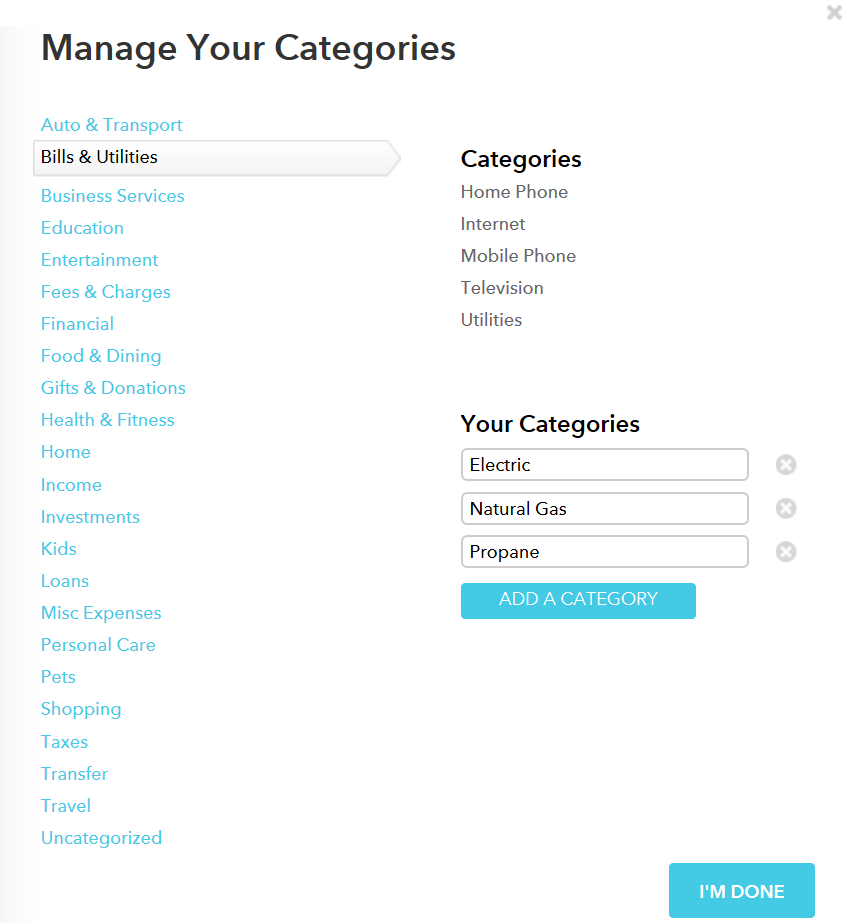
To add additional sub-categories, simply open the list as outlined above. Hover over a given category until the list of sub-categories within it displays, and you’ll find a “Add/Edit Category” option at the bottom. Selecting this link opens a window in which you can add additional sub-categories as desired:

You’ll notice in the above example that I have added additional sub-categories to “Bills & Utilities” for the sake of being able to separately track the FFP household’s spending on Electricity, Natural Gas, and (formerly) Propane. Without these additional categories, spending of all three types would simply be lumped into “Utilities”.
Keeping your desired budgeting and reporting preferences in mind, work through this above list and add any additional sub-categories you think you’d like to have. There are no right or wrong answers here, it’s all about what you’d like to know about your spending.
Custom Sub-Categories I Use
For sake of reference, I’ve listed the additional sub-categories below which I have identified a need or preference for over the last seven years:
- Auto & Transport – Car Wash, License Renewal, Plate Renewal, Tolls
- Bills & Utilities – Electric, Natural Gas, Propane
- Business Services – Website Hosting
- Fees & Charges – Closing Costs
- Financial – Investment Property
- Gifts & Donations – Tithe
- Health & Fitness – Birth Control, Vitamins/Supplements
- Home – Home Association Fee, Home Down Payment, Home Maintenance
- Income – Garage Sale, Online Sale, Tax Refund
- Personal Care – Facial Products, Feminine Hygiene, Oral Hygiene, Toilet Paper, Toiletries
- Pets – Bird Food/Housing
- Shopping – Jewelry
- Taxes – Tax Prep Fee
There’s no pressure to get this completely dialed in right now, as you can add or delete categories at will in future.
Assigning Or Changing A Category For A Given Transaction
As mentioned previously, Mint automatically assigns a category to each transaction. However, not every assigned category will be correct. For example, a grocery run to Wal-Mart may be classified by Mint as “Shopping”. To obtain the most accurate understanding of your spending, you would need to re-assign this transaction to the “Groceries” sub-category within “Food & Dining”.
This is why it is important to monitor your Mint transactions on a semi-regular basis to make any slight course corrections required. Doing so takes a minimal amount of time, yet pays large dividends by giving you a thorough understanding of your spending via the Trends reporting.
To assign or change a category for a given transaction, simply use the up/down arrows next to the currently assigned category from the grid view, then select the desired replacement.
Categories Deserving Special Mention
There are three Mint categories which merit additional discussion. Transfer is the first of these and should be used for any transfer of money between your existing accounts. If this category is assigned to a transfer transaction in both accounts affected, the transaction will correctly show as net-neutral and will not appear as spending or income for either account.
The Hide From Budgets & Trends category should be used for any transactions you don’t want to appear as either income or spending. I typically use this category for returned purchases. Doing so ensures that the original purchase and ensuing refund transactions are excluded from reporting and spending and that categories such as “Shopping” are not overstated.
The Uncategorized category can be used to flag transactions which you believe need to be assigned to a different category upon review. Uncategorized transactions show bolded in the grid overview for easy identification.
Uncategorized also contains two sub-categories – Cash & ATM and Check. Cash spending for which you have no record on what it is spent on can simply be assigned to “Cash & ATM”. You will not have visibility into what this money was spent on, but can see the total in the category. Any checks written will be assigned to the “Check” category and will be bolded. You can reassign these transactions to the category to which the spending belongs, if you know it.
Mint Transaction Details
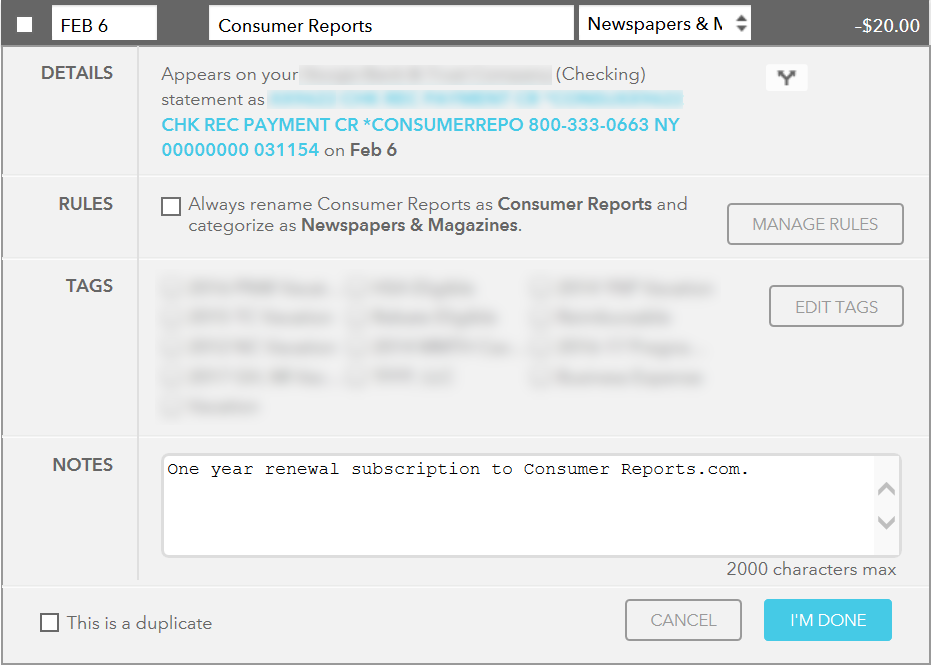
When you click on a given transaction from the Mint Transactions page, you’ll see a button titled “Edit Details” appear centered within the row. Selecting this button gives you some additional information about and options for the transaction:

Changing Transaction Date, Description & Category
From time to time you may wish to alter the date assigned to a transaction. Because Mint budgets on a monthly basis, if a given transaction falls on the wrong side of the new month by just a single day it can mess with your budget calculations. If this happens you can make an adjustment simply by clicking on the transaction date and selecting the new desired date from the menu that displays.
Similarly, you may occasionally wish to change the transaction description to make it easier to comprehend. You can do that from the details screen above by simply selecting the field and entering the desired value.
You can alter or reassign a category from this screen in the same way that you can from the overview.
Creating & Managing Transaction Rules
Mint transaction rules are your friend. Once initially configured, these help Mint assign the correct category to certain transactions automatically. For example, if the Consumer Reports transaction pictured above was initially categorized as “Shopping”, I could reassign it to “Newspapers & Magazines”. After doing so, Mint would provide me with the option to create a rule that any transaction from Consumer Reports should always be assigned to this category.
While this obviously wouldn’t work well for broad-based retailers like Wal-Mart or Amazon, it works incredibly well for one-off service providers and billers, particularly utilities.
You can use rules to automatically rename and/or re-categorize transactions from a specific biller. To do so, simply check the box shown on the form above. You can edit existing rules using the button in Transaction Details or the hyperlink at the bottom right corner of the Transactions page.
Splitting Transactions Into Multiple Categories
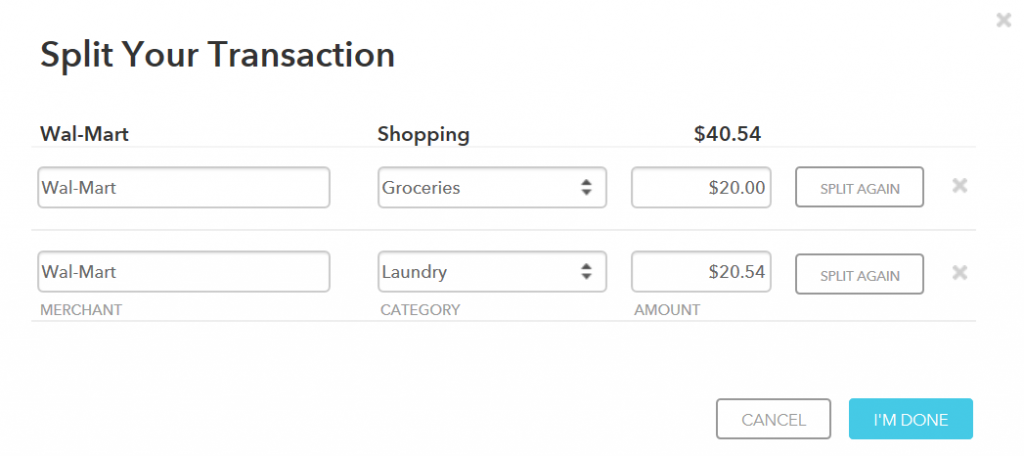
You may be wondering how to categorize transactions which consist of items belonging to several different categories. For example, say you make a trip to Wal-Mart and spend $40.54 purchasing an assortment of groceries and laundry supplies:

In these situations, Mint allows you to split the transaction into multiple categories. To do so, you first need to “Edit Details” from the Transactions page, then select the small Y-shaped double-ended arrow button in the upper right of the Transaction Details form pictured in the above Consumer Reports example. Upon doing so, you’ ll be presented with a dialog box where you can split the original transaction to represent the proper amounts and categories:

Once you’re done, you’ll be redirected to the Transactions grid view. After locating your original transaction, you should see it now split into your designated categories and amounts, with a “Y”-shaped symbol next to each to indicate they are split transactions. This is what our original $40.54 transaction looks like in the overview once we’re finished:

How To Handle Sales Tax
When splitting one transaction into several based on a given receipt, you may be left with a remainder above and beyond the total of the item prices in each category due to sales tax. I recommend including the portion of sales tax incurred with the total of each category.
Alternatively, you could create a third category in the above scenario and assign it to “Sales Tax”, but this creates inconsistency with single, non-split transactions in which the entire purchase total is assigned to a given category with no portion assigned to sales tax.
Using Transaction Notes
As illustrated in the Consumer Reports subscription example above, notes up to 2,000 characters can be entered on any given transaction. This is purely optional, but can be very helpful for documenting warranty duration for larger or more expensive purchases. If you want the ability to differentiate purchases for items within the same category, you can use notes to indicate what was purchased and when.
These notes are visible within the Transaction Details screen and also in the right sidebar of the Transactions overview when a given transaction is selected. These notes are also visible from other menus elsewhere in Mint, such as Trends and Budgets.
Marking Transactions As Duplicates
Mint may occasionally download the same transaction from your account more than once. This creates duplicates which can overstate your income and/or spending.
If you identify a duplicate transaction, you can mark it as such using the checkbox in the lower left corner of the Transaction Details screen, as illustrated in the above Consumer Reports example. Once marked as a duplicate, a transaction is greyed out and excluded from all reporting.
In my experience, duplicate transactions are typically caused when a user edits a Mint transaction that is still in the “pending” status, indicated with italics. Avoid making any edits to transactions which are in this state and duplicates should seldom be an issue.
Filtering & Searching Mint Transactions
You can filter, sort, and search Mint transactions in several different ways. You’ll notice a list of account types in the upper left of the Transactions page, with individual accounts listed in the sidebar below. You can use these to select either an account type or a specific account to view only the transactions associated with your selection.
Additionally, you can toggle the Date, Description, Category, and Amount columns can to filter the displayed transactions in either ascending or descending order according to your selection.
Creating & Using Transaction Tags
You can use tags to group Mint transactions from different categories for sorting and tracking purposes. Mint starts you out with some basic tags like “Reimbursable”, but you can create additional tags via the button in Transaction Details or via the section in the left sidebar of the Mint Transactions page.
For example, you could create and use tags to differentiate between you and your spouse’s spending. I’ve personally found tags helpful for tracking HSA-eligible medical expenses, rebate-eligible purchases, and all expenses related to specific vacations or trips.
You can add a tag to a transaction by checking the box for the desired tag or tags in the Transaction Details screen. Reference the blurred portion of the above Consumer Reports transaction.
To filter all transactions by a given tag, simply select it from the list displayed in the left sidebar of the Transactions page, located under the Accounts section.
Searching Transactions
The top of the Mint Transactions page contains a search bar which you can use to search any transaction attribute – date, description, category, transaction amount, even tags. Simply type what you’re searching for into the search bar and it will use auto-complete to provide you with a list of available options:

Note that Mint distinguishes between categories and sub-categories in search by using =: and :, respectively. In the above example, the first option will return all transactions which are assigned specifically to the “Shopping” category. The second option will return results of all transactions which belong to either the parent “Shopping” category OR any sub-categories within it.
The search function is quite helpful for locating specific transactions or groups of transactions.
Additional Features
The main Mint Transactions page has several additional features, described in detail below.
Editing Multiple Transactions At Once
You can edit multiple transactions at once by simply selecting them via the checkbox next to each, clicking the “Edit Multiple” button at the top of the page, and assigning the required attribute via the Transaction Details screen. I’ve found this most helpful for marking multiple transactions as duplicates.
Adding A Transaction Manually
You can add transactions manually if needed. For example, if you hoard your savings stash under your mattress and dip into it to make a purchase, Mint will be none the wiser due to a lack of any transaction in your bank or credit card account. You can use the “+ Transaction” button at the top of the page to add such transactions manually.
Changing The Number Of Transactions Displayed Per Page
Mint paginates transaction results, which you can navigate by selecting page numbers in the lower right hand corner of the screen. You can control the number of results Mint displays on a given page here as well. For shorter load times, select a smaller number; for longer load times but less toggling between pages, increase this value. I personally use the maximum display of 100 transactions per page.
Exporting Transactions To Excel
Mint possesses an underappreciated feature which enables you to export transactions to Excel. This gives you the flexibility to further manipulate data should you feel so inclined, or simply back up your financial history complete with the notes you’ve entered in Mint. I perform a mass export of all transactions every 6-12 months to be sure I don’t lose my financial history.
Summary
Kudos, you’re a Mint transactions pro! You now know how to ensure that your financial transactions are properly reported, categorized, and tracked by Mint. This is essential for leveraging the power of Mint’s Budgets and Trends functionality, which we’ll be taking a look at soon. As the old adage goes, “garbage in, garbage out”!
Taking the time to familiarize yourself with Mint Transactions is crucial to laying a solid foundation for your money management system. While the initial configuration may take a bit of initial setup in the form of creating sub-categories, rules, and tags, once you get rolling Mint does a pretty good job of staying on cruise control.
All you need to do is a bit of work up front. So stretch that string, break out that level, and do the prep work now to ensure that your financial foundation will be built correctly, one transaction – and brick – at a time.
Next Steps
For those of you who have been following the Master Your Money series from the beginning, below are the next steps on your journey to financial freedom:
- Review all existing transaction categories and add sub-categories for any expense types you know you’re interested in tracking separately via either Mint Budgets or Trends.
- Review all existing transaction tags and add additional tags for any transactions across multiple categories which you know you’re interested in grouping.
- Create transaction rules for one-off service providers and billers to ensure these expenses are properly categorized automatically in future.
- Review all “Cash & Credit” account type transactions from the last 30 days (minimum) or 90 days (ideally) and assign to the proper categories to enable Mint to create more accurate initial Budgets and Trends reporting.
- Form a habit of and system for monitoring new transactions in Mint on a weekly basis to make any required adjustments to the way Mint is categorizing your income and spending.


Join The Conversation!